Locator-U1🔗
Description🔗
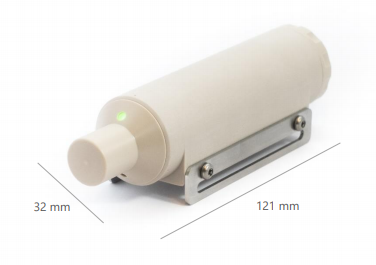
The Locator-U1 is a battery-powered, digital hydroacoustic locator device. It includes an internal GPS-based time-sync module, eliminating the need for a tether. This makes it ideal for divers, ROVs lacking convenient power sources, or other underwater applications.
The Locator-U1 has its own pressure sensor and measures its own depth. The topside uses this depth together with the acoustic signal to calculate the position of the Locator-U1.
The Locator-U1 uses GPS only to synchronize its clock, not to find its own position. The topside needs GPS as well: for its own position and for the same clock synchronization. Both clocks must be synchronized for the topside to position the Locator-U1. The synchronization of the Locator-U1 is what its status LED reports, and it is often called GPS lock.
Note
You will need GPS lock on the topside as well when using the U1. This is for timing purposes, it will not help to use only external GPS position as this can not be used for time synchronization. It is not enough to only have GPS lock on the U1.
Before each use🔗
Use this checklist to get the Locator-U1 ready. Each step links to the detailed description further down the page.
| Step | What to do | LED |
|---|---|---|
| 1 | Charge the Locator-U1 with a 5 V / 2 A wall adapter, within 24 hours before use. On SN: 0556 and higher the LED turns solid green when the battery is full; on SN: 0555 and lower, charge for 7 hours. | → SN: 0556 and higher |
| 2 | Unplug the charger. With the cap off, set the channel on the rotary switch to the same channel as in the GUI. | |
| 3 | Check that the O-ring in the cap is clean and undamaged, then screw the cap on to power on. The Locator-U1 searches for a GPS signal to synchronize its clock. | |
| 4 | Keep the Locator-U1 in open sky until the LED turns solid green. Its clock is now synchronized and it is ready to use. | |
| 5 | Make sure the topside also has GPS lock, then deploy. Recover the Locator-U1 within about 6 hours. |
Charging🔗
The Locator-U1 has an internal rechargeable battery. Use the included USB-C cable and a 5 V / 2 A (or higher) wall adapter to charge it. Always fully charge the Locator-U1 before each operation.
Warning
Do not use your computer to charge the locator. A computer USB port does not supply enough power to charge the Locator-U1.
1) Remove the cap
Unscrew the cap completely to access the USB-C charging port.
2) Insert the USB-C cable
Plug one end of the cable into the Locator-U1’s charging port.
3) Connect to a suitable power source
Attach the other end of the cable to a wall adapter providing at least 5 V / 2 A.
4) Charge the battery
On SN: 0556 and higher, the LED shows when the battery is full: charging is finished when the LED stops breathing and is solid green.
On SN: 0555 and lower, the LED does not show the charging status, so leave the Locator-U1 connected for a full 7 hours.
Charging overnight the night before use is a recommended routine.
LED behavior while charging🔗
The LED behavior while charging depends on the serial number (SN) of your Locator-U1. The serial number is printed on the flat side of the Locator-U1, where the bracket is mounted. Select the tab that matches your unit.
When connected to a charger, the Locator-U1 only charges. It does not power on, does not search for GPS, and the LED shows the charging status only:
| LED | Signal | Meaning |
|---|---|---|
| Breathing green light (slowly fading in and out) | The Locator-U1 is charging. | |
| Solid green light | The battery is full. Here solid green means fully charged, not time synchronized. |
Screw the cap on to power the Locator-U1 on. The LED then shows the time synchronization status instead, as described in LED behavior while in use.
When connected to a charger, the Locator-U1 powers on and charges at the same time. The LED does not indicate charging progress:
| LED | Signal | Meaning |
|---|---|---|
| Flashing green light | The Locator-U1 is powered on and working normally, for example searching for a GPS signal. This does not reflect charging status. | |
| Solid green light | The Locator-U1 is powered on and its clock is synchronized. This does not mean it is fully charged. Keep charging for the full 7 hours. |
Powering on and off🔗
-
To power on the Locator-U1, securely tighten the cap over the charging port. The LED will begin flashing to indicate that it is searching for a GPS signal. Once the LED stops flashing and becomes solid, the clock of the Locator-U1 is synchronized and it is ready for use.
Ensure the O-ring in the cap is undamaged before submerging the device. -
To power off the Locator-U1, unscrew the cap until the LED turns off.
LED behavior while in use🔗
These signals apply when the Locator-U1 is powered on by screwing on the cap. The LED shows whether the clock of the Locator-U1 is synchronized with GPS time, which it needs in order to be positioned by the topside (the topside must be synchronized too). For the LED while connected to a charger, see LED behavior while charging.
| LED | Signal | Meaning | Ready to use? |
|---|---|---|---|
| No light | Power is off, or the battery is empty. | No | |
| Flashing green light (once per second) | Searching for a GPS signal. The clock is not synchronized yet. | No | |
| Solid green light | The clock is synchronized with GPS time. | Yes | |
| Flashing green light (slow) | The GPS signal has been lost, for example because the Locator-U1 is in the water. The time synchronization is still valid, so the Locator-U1 keeps working. | Yes | |
| Fast flashing green light (multiple times per second) | Error. See Error indication. | No |
Note
The animations above illustrate the LED patterns. The exact timing on the Locator-U1 may vary slightly.
Empty battery🔗
A completely empty battery looks the same as a Locator-U1 that is switched off: the LED stays dark. So if the LED is dark with the cap screwed on, the Locator-U1 most likely needs charging.
If the LED also stays dark when the Locator-U1 is connected to the charger, the battery is so deeply discharged that it may be damaged. Leave the Locator-U1 connected to the charger, as this can recover the battery. If the LED is still dark after a full charge, contact support.
Error indication🔗
A fast flashing LED often means one of the following:
- The Locator-U1 has exceeded its operating time and the pressure sensor needs to dry. Charging the Locator-U1 helps the sensor dry more quickly.
- Another internal failure. If the LED keeps flashing fast after the pressure sensor has dried, contact support.
Channel selection🔗
The channel is selected with the rotary switch inside the cap. Unscrew the cap completely to access the switch. The channel on the Locator-U1 must match the channel selected in the GUI settings. Channel 3 is usually a good choice. See the channel overview for the frequency band of each channel.
Operating time🔗
The Locator-U1 can be used for about 6 hours at a time. After this it needs to be brought to the surface, because all three of the following have run out:
- The pressure sensor needs to dry, otherwise the depth readings become inaccurate.
- The battery needs recharging. How long the battery lasts varies with the water temperature, and is shorter in cold water.
- The GPS time synchronization needs refreshing, which the Locator-U1 does in open sky.
Warning
Do not keep the Locator-U1 submerged for longer than about 6 hours. It then requires charging and time to dry the pressure sensor in order to provide accurate depth readings.
Troubleshooting🔗
| Problem | What to check |
|---|---|
| The LED is dark when the cap is screwed on | Make sure the cap is fully tightened. If the LED stays dark, see Empty battery. |
| LED keeps flashing once per second | The Locator-U1 has not synchronized with GPS time yet. Move it outdoors with a clear view of the sky. Indoors, a GPS repeater or similar is needed. |
| No signal from the Locator-U1 in the GUI | Check that the LED of the Locator-U1 is solid or slowly flashing green, that the topside has GPS lock, and that the channel on the rotary switch matches the GUI. See also Warnings. |
| Fast flashing LED | See Error indication. |
| Battery runs out sooner than expected | Charge within 24 hours before use with a 5 V / 2 A wall adapter, not a computer. The battery also lasts shorter in cold water. |
Wiring interface🔗
Since the Locator-U1 is battery powered, its only interface is the charging port, which is a standard USB-C connector.
Included in package🔗
- Locator-U1
- USB-C charging cable
- Mounting bracket
Mounting and dimensions🔗
Each side of the Locator-U1 has three M3 mounting holes, and the included bracket fits these. The serial number is printed on the flat side where the bracket is mounted.